- Words and Recipes Ellie Short Photography Don Denton
She surveys her palette: hues of creamy whites, muted reds, earthy browns. She ponders over her canvas, a blank backdrop awaiting adornment. Her tools are her hands, a knife, a spoon. She is guided by her senses; sight, smell…taste. She thoughtfully makes her first brushstroke—a honeycomb in the centre of dark mahogany. An artistic experience begins. It concludes with a soapy sink, full bellies, satisfied smiles and fading laughter in the background.
For anyone who has ever enjoyed a considerately curated charcuterie board, you have been on the receiving end of a sensory undertaking. You have gazed upon the beauty of simple ingredients attentively arranged with care and precision. You have crafted your own creations with each curiously constructed bite, layering flavours and textures, making new exciting combinations and savouring preferred pairings. You have engaged in the communal analysis, the cultural dissection of discussing the ingredient groupings and favourites with your fellow gastronomes. Visually, experientially and, quite literally, the charcuterie board is often the centrepiece, as well as the masterpiece of the evening.
However, to be the maker behind the chef-d’oeuvre is a whole other practice and one that adds a delicious layer of creative expression and imaginative enjoyment. For many though, conceptualizing a board can feel intimidating. Where to start? What to get? What direction to take? They’re the common questions and naturally nervous thoughts of any new artist exploring an uncharted medium.
We’ve all seen hundreds of paintings, but what is the process? What paints to choose? What canvas to buy? What method to explore? Just like with all art, there is no right or wrong way to make a charcuterie board. However, if you’re looking for a bit of inspiration to get started, the following may offer some loose guidelines to play with, keeping in mind that with all art—both the expression and interpretation are subjective and the possibilities endless.
What you’ll need
The canvas: While most traditionally and commonly made of wood, I have seen, curated and enjoyed many good charcuteries on stone slabs, ceramic platters and even just a basic dinner plate.
The number of folks you’re feeding and the ingredients you’d like to showcase will determine the size, and shape is often dependent on the theme you’re exploring. For example, if it’s a sumptuous starter for a farm-style feast you’re after, try a long and narrow board, almost like an edible table runner.
The palette: If you’re new to charcuterie creation and aren’t wildly familiar with, or particular about, cheese and cured meat varieties, I suggest simply exploring textural range. I usually start with a soft cheese (brie, camembert, chevre), add in a medium cheese (gouda, compté, fontina) and then a harder cheese (aged cheddar, manchego), as well as a pâté or terrine, some pancetta or prosciutto and a salami of sort like genoa, felino or bresaola. After that comes the complementary spreads, which may include a tart or grainy mustard, a jammy preserve and honey.
The bases of your choosing also lend well to textural variety; soft chewy bread, nutty seedy crackers or classic crisps all offer something different to each bite.
Last, but certainly not least, you’ll likely want to explore some tasty trimmings, such as the classic accompaniments of nuts, olives, cornichons and grapes. I encourage imaginative consideration here, though, and often find my most exciting boards unfold when I include nibbles like marinated mushrooms, pickled peppers, sun-dried tomatoes and chewy dates.
The tools: Your hands of course are your best instruments for assembly, but to appreciate and enjoy your creation, you and your guests will need a few essential implements.
While it’s arguably impressive and certainly convenient to acquire particular utensils for specific cheeses, your guests will likely be just as content with a small paring knife to cut their camembert. What’s more important is to have enough (even if you’re just using dinner knives), and to make sure you include spoons for the spread. It can be painfully tormenting for drooling participants to be staring at the bounty before them with no way of getting the goods onto a cracker and into their mouths.
You will also need a small bowl for olive pits, cheese rinds, and anything else your guests might want to discard as they dine. A sure-fire way to evoke audience aversion is to have spitty pits and half-nibbled rejects awkwardly and embarrassingly scattered throughout the edible landscape.
How to make it
Consider style: Minimalist? Pop art? Abstract?
While it may seem silly to even name these iconic artistic movements in a story about building edible boards, I have found that drawing on some of these concepts from a purely superficial standpoint can guide me through a theme, or inspire a certain vibe. I love having that singular focus of a showstopper meat, an adventurous cheese, a perfect preserve and simple slice of sourdough, to anchor a minimalistic spread.
I also adore a big, bold, beautiful mess, where each ingredient sort of melts into another. Whatever your intended outcome, start slow, perhaps one category at a time, placed evenly throughout the board, and build from there, knowing that you can rearrange and redirect at any time if your moods shifts and you’re feeling suddenly inspired to take it in a different direction.
Rule of thirds: While there are absolutely no rules for making a charcuterie board, when building classically appealing “Instagram-able” / “Pinterest-worthy” spreads that seem to find the ideal balance between abundant and overflowing, but are yet tidy and tasteful, I will often go for three varieties of the main components (cheese, meat and spread), arranging them on the board one category at a time, and then filling in the holes with the accoutrements of nuts, olives, fruit, etc.
Whether or not you place the bread or crackers on the board itself is (like everything) a personal decision, and may depend on dietary considerations like gluten sensitivity. However, I often go for a combination, incorporating some crackers on the board, and fresh bread (with perhaps a little olive oil and sea salt for dipping) on the side.
The final touches: Whatever themes you’re inspired by, ingredients you’re working with, or concepts you’re exploring, I find certain details seem to turn a basic board into a memorable masterpiece. Edible flowers, microgreens, a small sprinkle of something special—there’s a reason garnishes are so popular when plating and practicing artful presentation. Do keep in mind, of course, to not mask the main event with unnecessary decorations.
Beyond meat (and cheese)
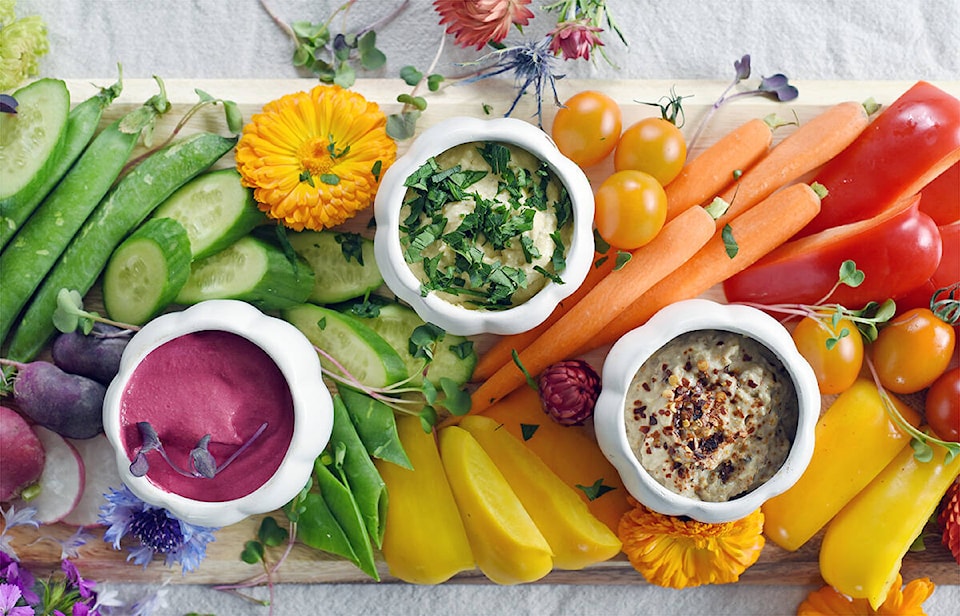
While I’ve largely explored the classic combination of charcuterie et fromage, many foods lend well to a beautiful board display. A rainbow-inspired veggie platter, a deconstructed fruit salad with a dreamy dip, a fun and funky dessert board with a chocolatey theme…I’ve even done a DIY pancake board that is always hit for brunch-time gatherings.
As with all art, there is no limit on what you can do and how you can do it! Have fun, get creative, and if you’re feeling overwhelmed, keep in mind that what you’re eating is more important than how it’s presented, and what folks will remember is not necessarily how everything looked, but how it made them feel. And that is what art is truly about.
Balsamic Fig Preserve
Prep time: 5 minutes
Cook time: About 1 hour
Makes about 1 cup of preserve
Ingredients:
6-8 soft fresh figs
2 tbsp balsamic vinegar
1 tbsp maple syrup
2 tbsp fresh squeezed orange juice
1 sprig fresh rosemary
Directions:
Trim the figs and slice them in half.
Place them in a medium-sized saucepan with all the remaining ingredients, over medium-low heat. Cook until everything is thick and jammy, stirring regularly throughout, mashing up the figs as you go, for 45 minutes to 1 hour. *Note: if you’re noting the figs aren’t breaking down after about 15 minutes, add more orange juice, or even a splash of water and give it a good stir and mash.
Remove the rosemary sprig and any large rosemary needles, and transfer the fig jam to a sterilized and dry mason jar for canning (leaving some space at the top before sealing). Or, if consuming more immediately, allow the jam to cool to room temperate and store in the fridge for up to three weeks.
Creamy Roasted Beet Dip
Prep time: 10 minutes
Cook time: About 45 minutes
Makes about 1.5 cups of dip
Ingredients
3 medium-sized beets, peeled and cut into chunks
1 large clove of garlic, peeled and trimmed
¼ cup extra virgin olive oil (plus about
-2 tbsp for roasting)
¼ cup plain Greek yogurt
¼ cup feta cheese
Handful of fresh dill
Salt and pepper to taste
Directions:
Preheat oven to 400F.
In a medium-sized mixing bowl, toss the beets in some olive oil and place in a baking dish with a lid (you can also use aluminum foil if you don’t have any covered baking dishes).Roast for about 45 minutes, turning the beets once or twice, until fork tender. Allow the beets to cool, and then combine them with the remaining ingredients in a high-powered blender until smooth and creamy. Transfer to a container and store in the fridge for up to one week.
Honey Lemon Cream Cheese Whip
Prep time: 10 minutes
Makes about 2 cups of whip
Ingredients:
½-¾ cup cream cheese
2 tbsp honey
½ cup whipping cream
Zest from 1 medium-sized lemon
Directions:
Using an electric mixer, beat the cream cheese and honey until completely smooth, scraping down the sides of the bowl as you go. Pour one quarter of the whipping cream into the cream cheese mixture. Beat until smooth. Scrape down the sides and repeat a second time until thick and fluffy.
Mix in lemon zest until just integrated. Store in the refrigerator until ready to use. *Note: If you want the whip to be on the softer side, make sure to take it out of the refrigerator for 10 to 15 minutes and give it a little whisk before serving.
Chocolate Almond Fudge Sauce
Prep time: 5 minutes
Makes about 1.5 cups of sauce
Ingredients:
½ cup dark chocolate chips
½ cup smooth almond butter
½ cup whipping cream
2-4 tbsp maple syrup
Pinch of salt
Directions:
In a small saucepan over medium heat, stir together the chocolate, almond butter and cream.
Continue stirring until the chocolate is fully melted and well-integrated with the almond butter and cream. One tablespoon at a time, add in the maple syrup until you’re happy with the flavour (this will depend on how sweet your dark chocolate chips are).
Add a pinch of salt, stir one more time, before taking it off the burner and transferring to a bowl for serving. *Note: the sauce will thicken as it cools.
Story courtesy of Boulevard Magazine, a Black Press Media publication
Like Boulevard Magazine on Facebook and follow them on Instagram